Navigation

Tuesday, April 28, 2020

Preferred Communication Email update into the email field on Contact object using Process Builder


Automatic update of Contact’s Email field
using Process Builder

This blog post demonstrates how to automate the update of the standard Email field on Contact when
a contact requests a change to their preferred email address.

Normally, a single default email address is stored on the Contact but there are times when multiple
email addresses are required. However, only one email address, the Preferred email address,
can be used for single or mass email communication. The Preferred email address is required and,
usually stored in the standard Email field on the Contact.

Typically, when a contact requests a change to their Preferred email address, the System Admin or
Support Team manually updates the standard Email field. This is time consuming and therefore is a
good candidate for automation. This post explains how to automatically maintain the standard Email
field on Contact using Process Builder and custom picklist. 

Requirement:

Automatically update the standard Email field on Contact with Preferred email address based on
a contact’s preferred communication method selection. 

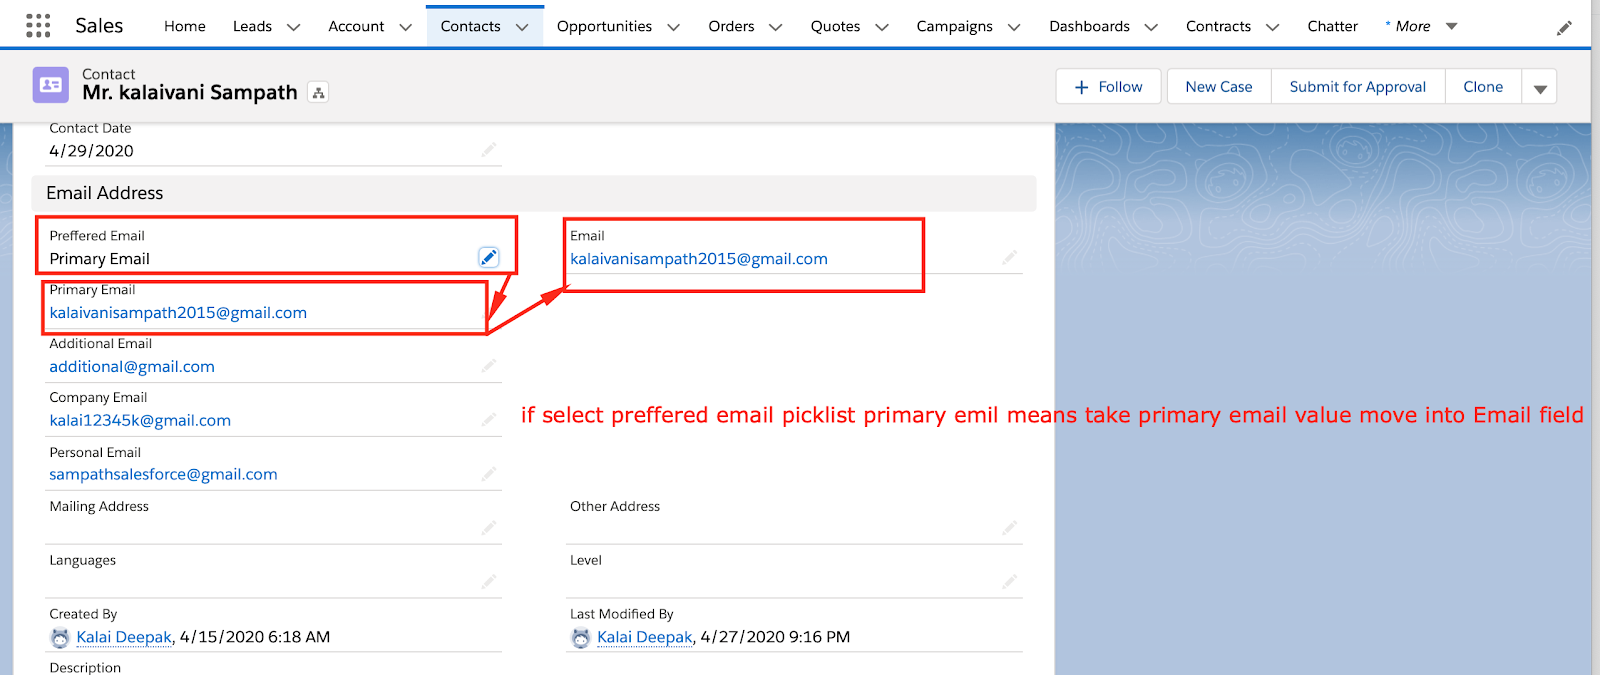
Step 1: The standard Email field is used to store different email addresses based on the contact’s
preference.

Email   →  (standard Email field on Contact). 

Step 2: Create 4 custom Email fields on the Contact to store different email addresses. 


S No
Field Name
API Name
Data Type
Description
1
Primary Email
Primary_Email__c
Email
Store Primary Email Address
2
Personal Email
Personal_Email__c
Email
Store Personal Email Address
3
Company Email
Company_Email__c
Email
Store Company Email Address
4
Additional Email
Additional_Email__c
Email
Store Additional Email Address
(if required)


Step 3: Create a Custom picklist field to store the different email options. 


S No
Field Name
API Name
Data Type
Values
1
Preferred Email
Preferred_Email__C
Picklist
Primary Email
Personal Email
Company Email
Additional Email


Step 4: Create a Classic Email Template to send the confirmation on the preferred communication
changes.  

Dear {!Contact.FirstName} {!Contact.LastName},

This is to confirm that your preferred communication email has been changed in our system.
You will now receive all subscription emails at your new preferred email address.

If you change your mind, feel free to call us and update your preferences.

Thanks & Regards,
Support Team


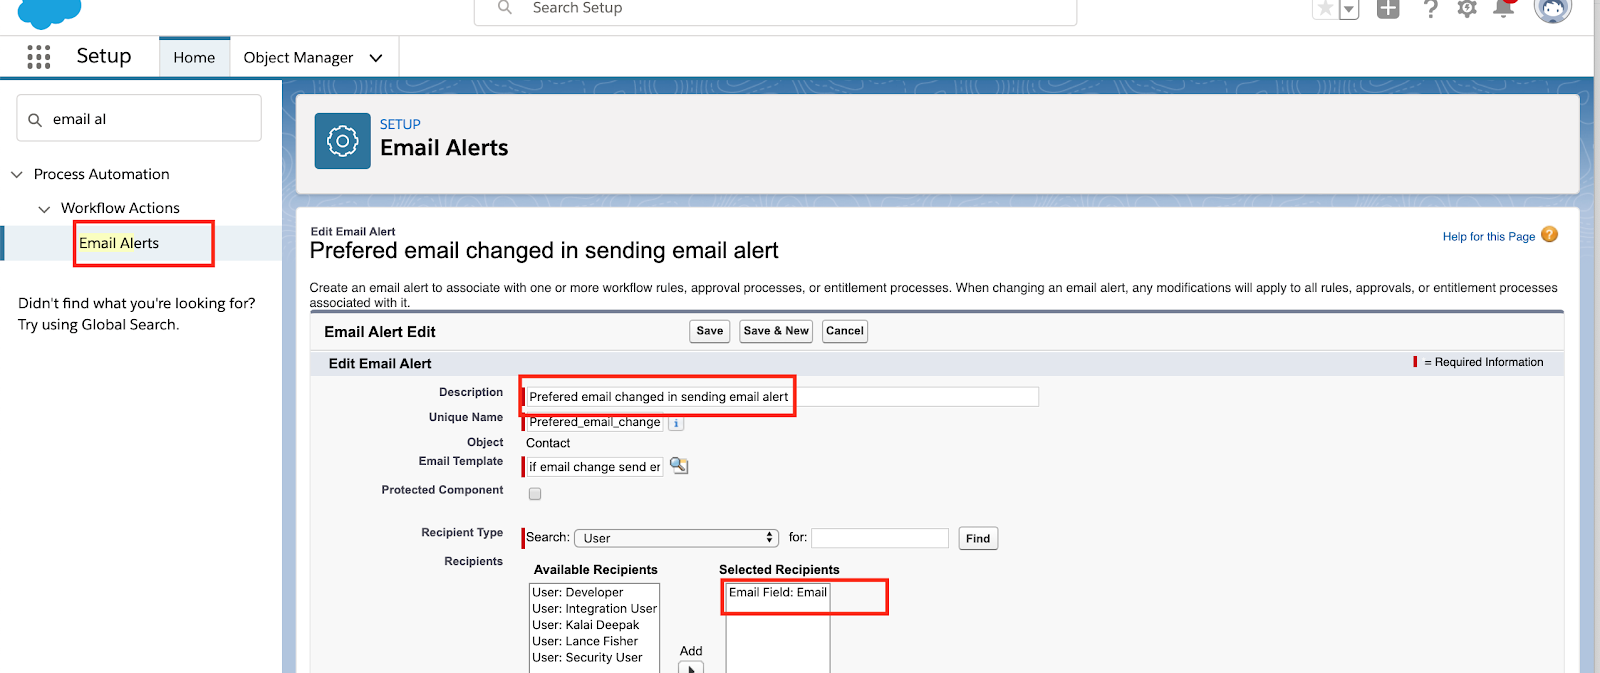
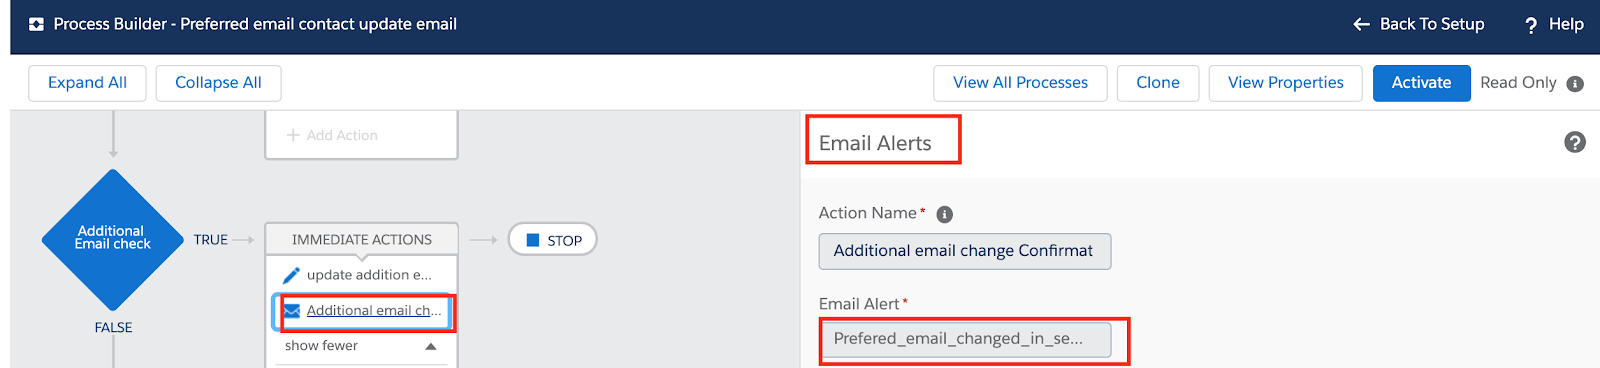
Step 5: Use Process Builder to create an email Alert that sends an email about preferred
communication changes.


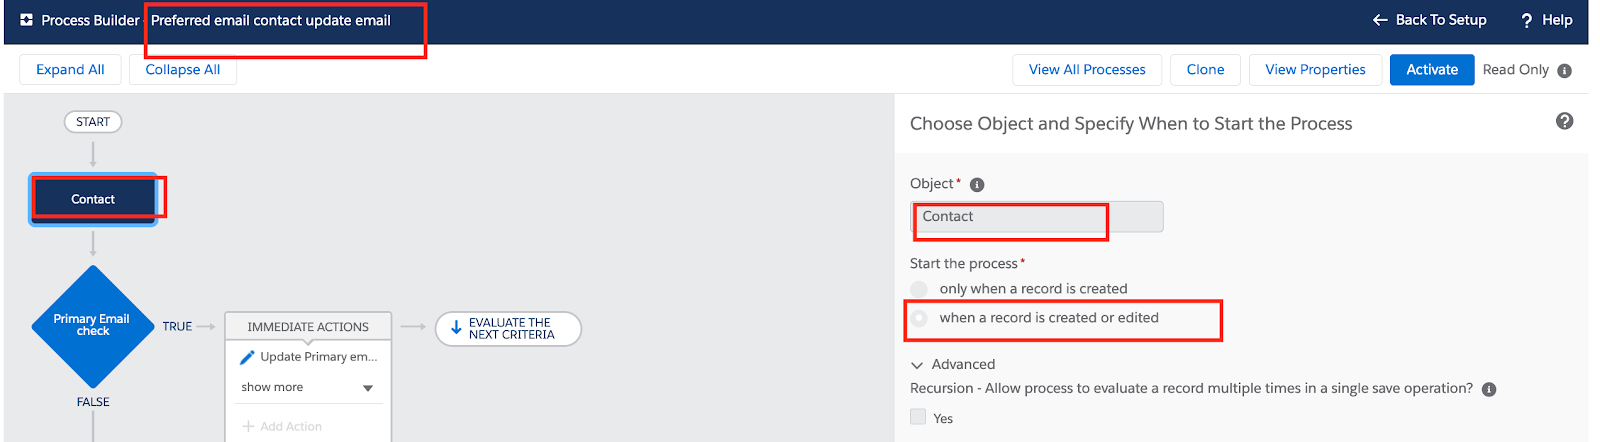
Step 6: Create Process builder “Preferred email contact update email” which runs each time a
Contact is created and every time it is updated. The specific email address will be updated on
the common email fields. 

→ Select Contact object
→ When a record is created or edited


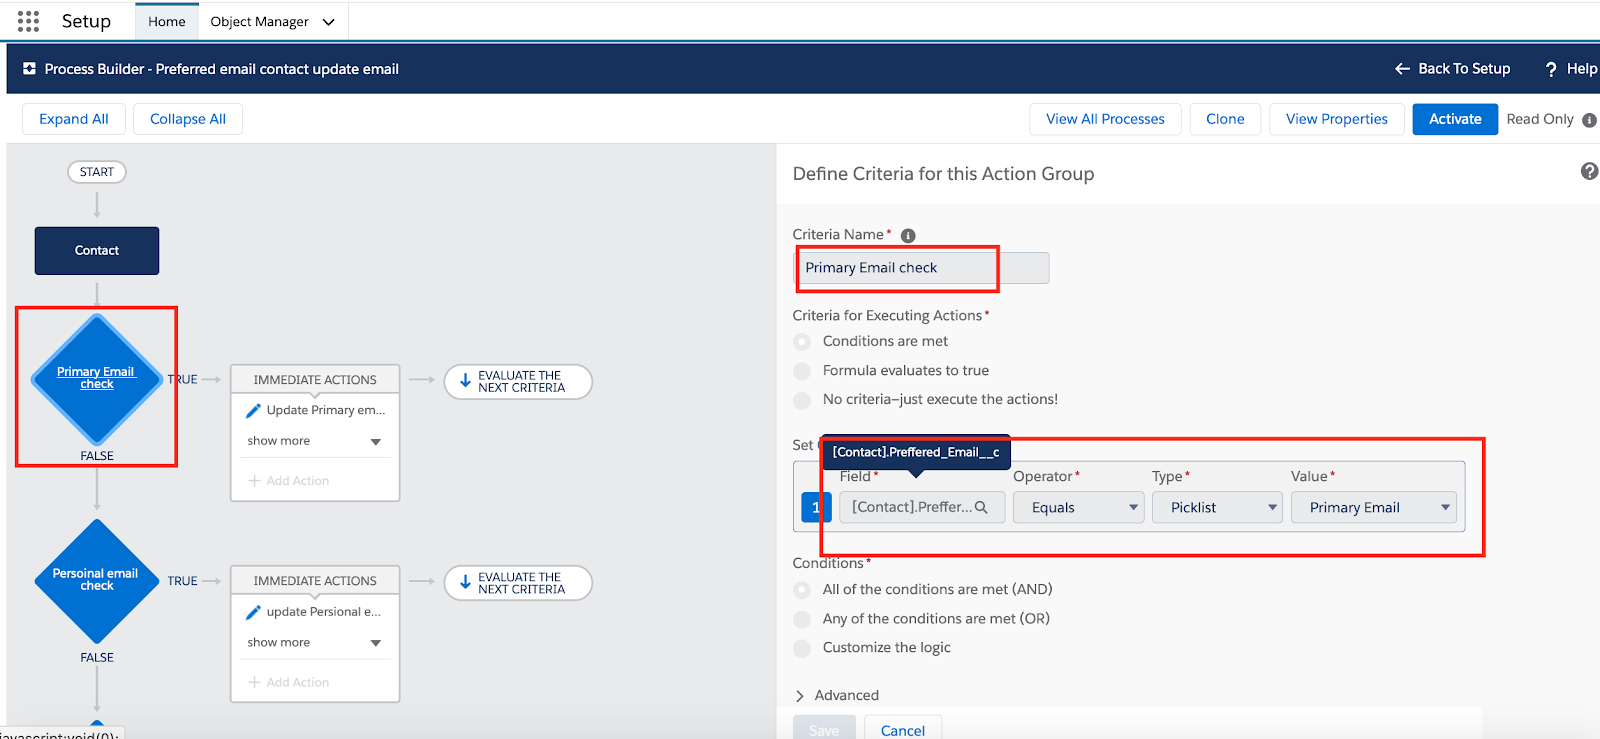
Step 7 :  Define Criteria for this Preferred Email equal to Primary Email.

  Preferred_Email__c ->Equal->Picklist->Primary value


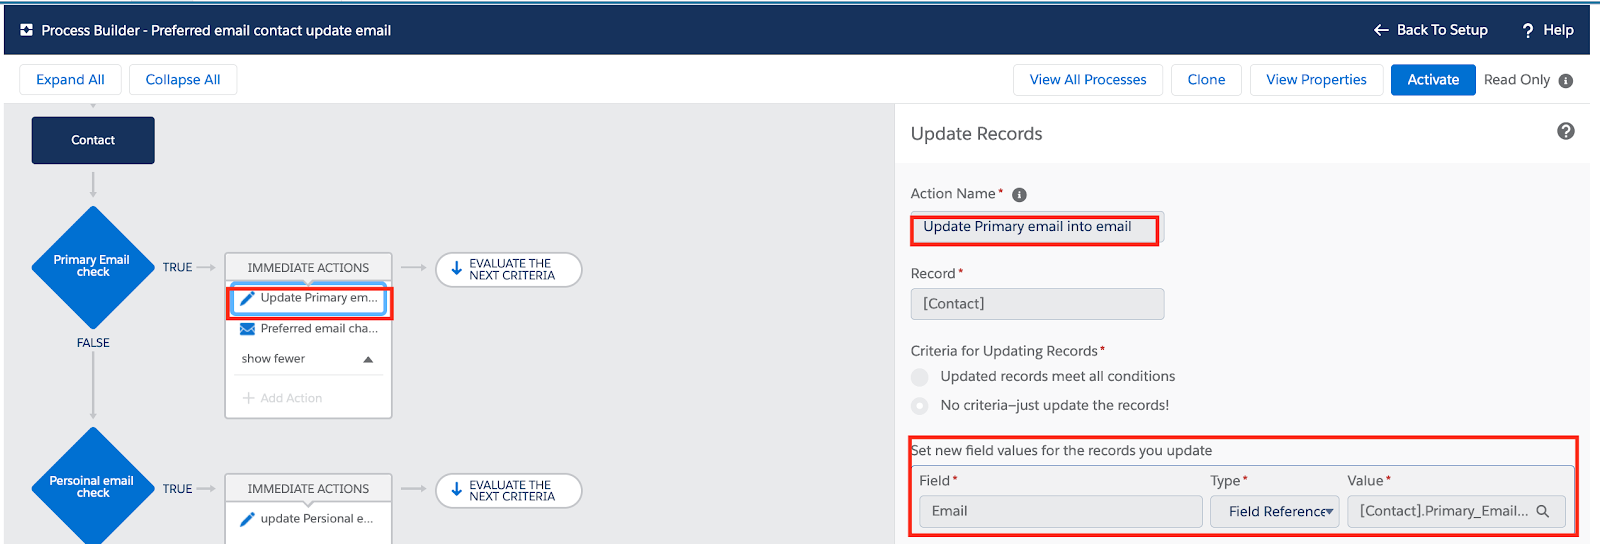
Step 8 : Add a field update action to update Primary Email address values into the Email Field.

Email->Field Reference->Primary_Email__c


Step 9:  Create an email alert action to send a confirmation email to the new Preferred email
address. 


Step 10:  Define Criteria for this Preferred email is equal to Personal Email address. 

    Preferred_Email__c → Equal →  Picklist → Personal Email


Step 11: Add a field update action to update the Personal Email Address. 
   
   Email->Field Reference->Personal_Email__c


Step 12 : Create an email alert action to send a confirmation email to the new Preferred email
address. 


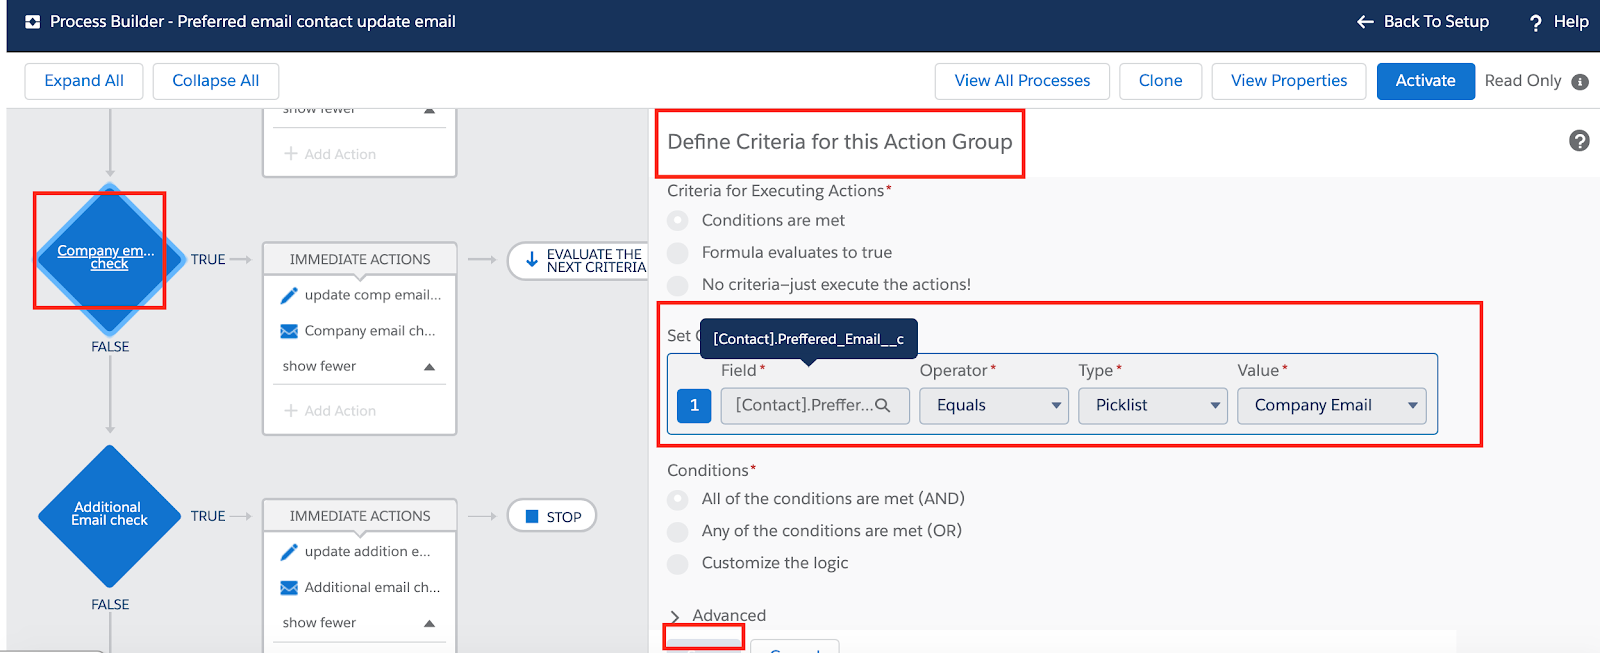
Step 13: Define Criteria for this Preferred email equal to Company Email
               Preferred_Email__c->Equal->Picklist->Company Email


Step 14:  Add an field update action to update Company email address.
  
                Email->Field Reference->Company_Email__c


Step 15: Create an email alert action to send a confirmation email to the new Preferred email
address. 


Step 16: Define Criteria for this Preferred email equal to Additional Email

  Preferred_Email__c->Equal->Picklist->Additional_Email__c
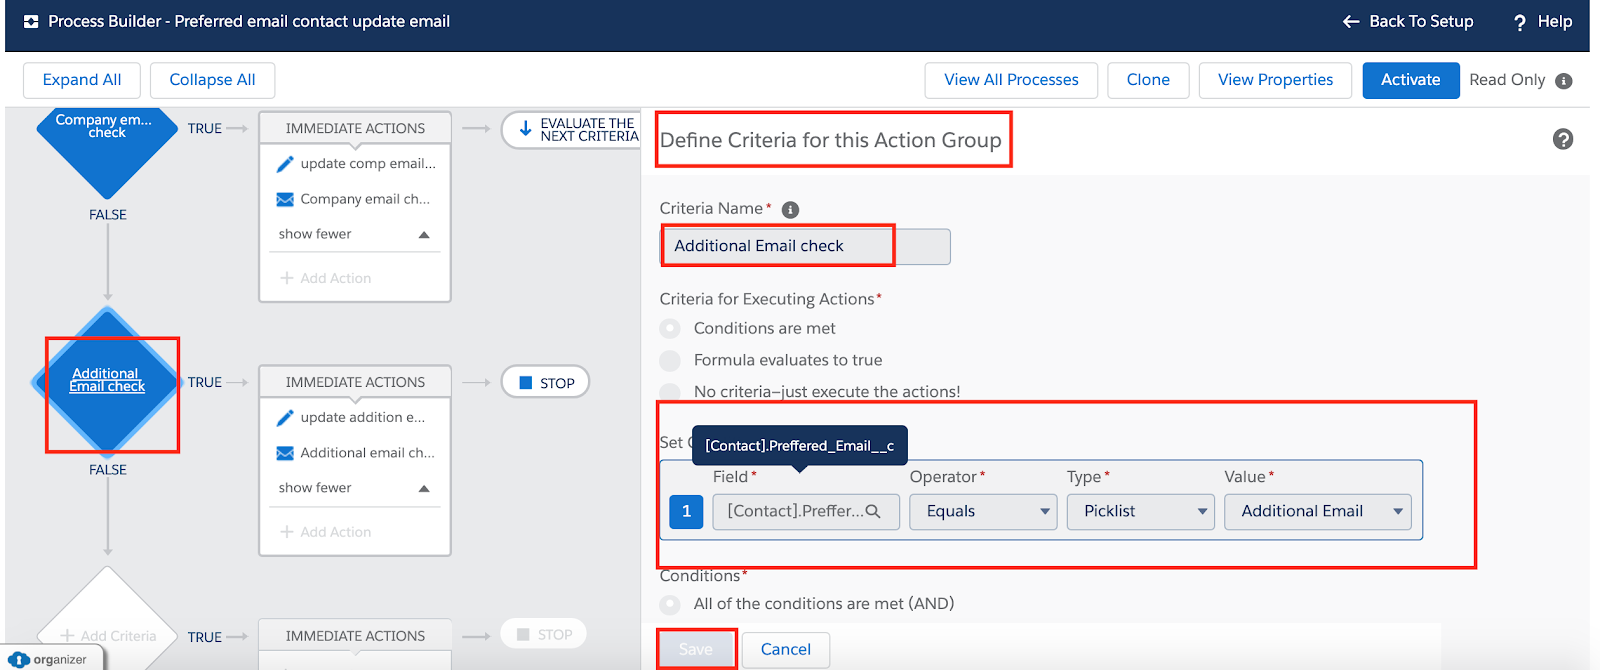


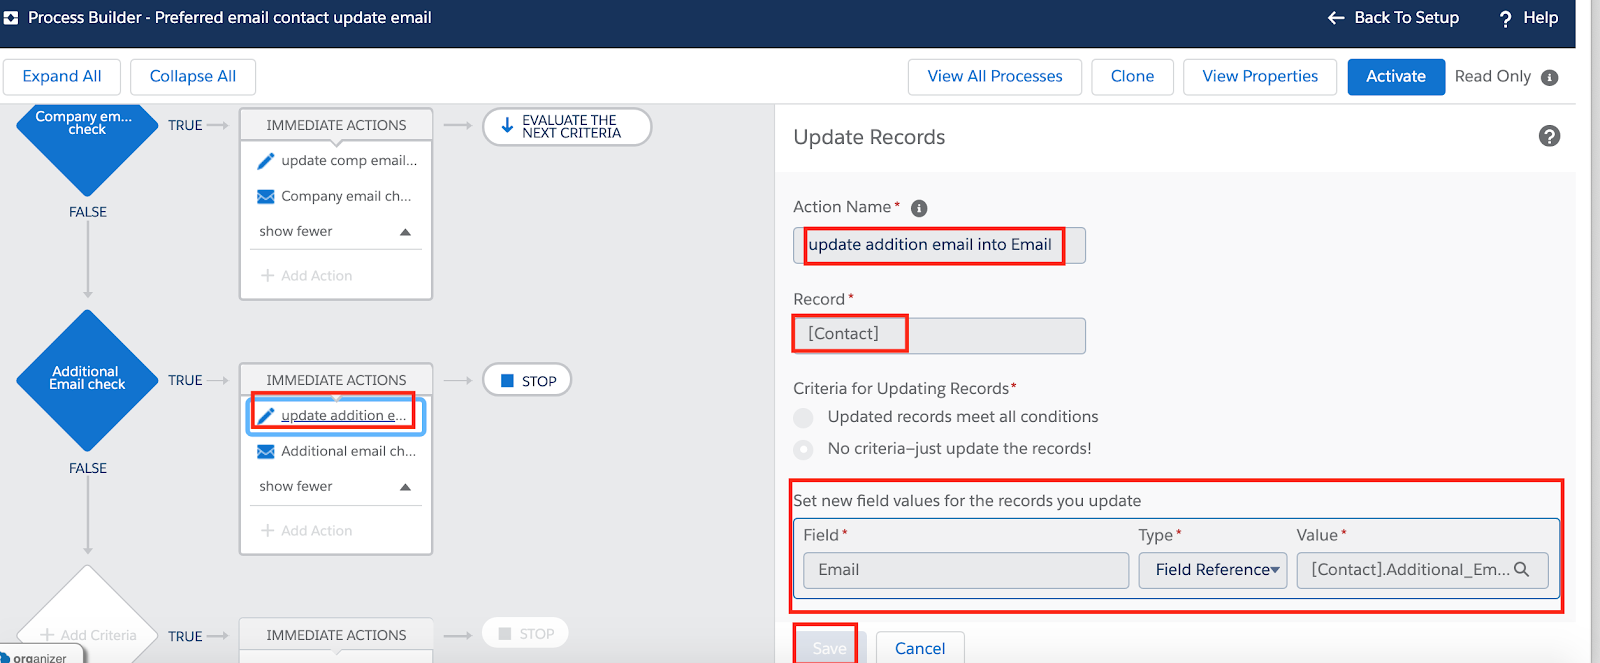
Step 17: Add an field update action to update the Additional email address into the Email field. 
  
   Email->Field Reference->Personal_Email__c


Step 18:  Create an email alert action to send a confirmation email to the new Preferred email
address.


Output


This approach provides an elegant solution to automate the maintenance of Preferred email
addresses. Using a custom picklist to select a contact’s preferred communication method
automatically updates the standard Email field on Contact and sends a confirmation email to
the contact.


Saturday, April 11, 2020

Put Back Multiple Files in MacOS


Recently, I’ve faced the problem that you can’t put back multiple files at once from Trash in MacOS.

The problem is that MacOS can’t restore 2 (or more) files from different directories. WTF?

At first, I was very frustrated because I had ~2000 files in there. Started looking out for a proper solutions & found script, which automates restoring process.

Script often failed, so I tweaked it & here is my version. I hope it could help you ;)


Friday, April 10, 2020

Form Assembly Advance Customization

Adding the Custom Javascript code to Form Assembly 


Step 1 : Create a new from in the Form Assembly. 

Step 2  : Add the “Text input” content to the form as shown below. 


Step 3: Add the “Text” content and past the below code to the HTML area as shown below.


Step 4: After publishing the form, you can see the following output. 

Wednesday, March 18, 2020

Salesforce Outlook Integration - Ability to edit the Email message.


Outlook Integration with Salesforce  (Ability to associate attachment into related record and Ability to Edit the Email Messages)


This blog series will help you to understand and configure the Outlook to salesforce and associate the email message attachment into a related record along with editing privileges on the email message after inserting it into salesforce. 


Outlook integration:

     Many of us are struggling to integrate the outlook into salesforce, but this blog will help you to implement the same step by step along with a screenshot.  


Email Message Attachment Associate into Related Record:

    In Salesforce email message attachment will be saved under the same email message, it’s very hard to view & navigate from related records, but this blog will help you to associate the email message attachment into a related record.  Users can see the attachment on the related record itself, no need to navigate into the email message to view the attachments. 


Ability to edit the Email Message 

    The general behaviour of the email message in salesforce is that we can't edit
the email message after it’s associated with salesforce, but this blog will help you edit the email message at any time. 


Configuring the Outlook Setting in salesforce :

Step 1: Login Salesforce Dev/Sandbox/production org.

Step 2:  After login into the salesforce, click on the setup →  Quick Find → Outlook Integration And Sync And Enable the Outlook Integration and Lightning Sync as shown below. 


Step 3: Expand Outlook Integration and In Email Application Publisher
Layouts Click the new button to create a new layout.


Step 4: Click on the edit button to edit the existing layout.


Step 5: Add or Remove quick action to the layout in order to access the outlook Panel, example contact, task, lead, Account in Outlook etc…


Integration & Adding salesforce Plugin into outlook


Step 1: Log in to the Outlook Office365 Account(Enter the Username and Password)
   
Step 2: Select the Outlook

A screenshot of a cell phone

Description automatically generated


Step 3: Click the App Launcher Icon:

A screenshot of a cell phone

Description automatically generated

Step 3: Click on the  “All apps” link to view the existing plug-ins as shown below. 

A screenshot of a cell phone

Description automatically generated

Step 4:  Click on the “Add-Ins” option to add the salesforce plug in. 

A screenshot of a cell phone

Description automatically generated

Step 5:  Search “Salesforce ” on the Search bar.
A screenshot of a cell phone

Description automatically generated

Step 6: Select Salesforce from the Drop Drown menu:

A screenshot of a cell phone

Description automatically generated


Step 7: Click to “Get it Now” to install the plug in outlook. 

A screenshot of a cell phone

Description automatically generated

Step 8: Click “Continue” from the popup window as shown below. 
A screenshot of a social media post

Description automatically generated

Step 9: The following screen will apply and Click Open in Outlook Web


Step 10: Open the email and click “More Action”  then Scroll down for more action and click Salesforce icon.


Step 11:  Select “Salesforce”  Then Click to “log in to salesforce” and then Enter the username and password


Step 12: Click to “Allow”

A screenshot of a cell phone

Description automatically generated
Step 13: It will redirect into a salesforce account then enter the Username and Password.


Step 14: Click on the confirm button to connect the outlook into salesforce. 


Step 15: Now successfully logged your developer account from outlook.


Step 16: Make sure you enabled Enhanced Email->Enabled>Attachment Goes to Email Message(Object)


Step 17: Enhanced Email->Disabled>Attachment goes to Contact ->Activity->Task.


 Step 18:  If no contact is found in salesforce, Click the "Add to Salesforce" link to create a record in salesforce or use the Create button to create a record.


Step 19: Click + Create icon to create a new task, Event, Contact, Account, etc.......


Step 20: if not display the object here we need to create quick action in global action and add publisher layout.


Step 21:then we need to add quick action  object into Email application publisher layout so that we can able to see the object into outlook


Step 22: Click to log Email along with Attachment checkbox tick and click Save.


Step 23: Attachment added into salesforce


Step 24: Click “Show this is record sale in salesforce" button.


Step 25: It will Create one task added attachment show in below


Step 26: Click Account name “outlook 2” it will Redirect into account page layout shows the attachment showing in files.


Step 27: Click edit button to modify email message it will redirect in custom Visualforce page 


Step 29: we need to override the standard Email Message “edit” button so that we can 
redirect.


Step 28:it will vf page and Modify the date and text body and subject then click save.


Content Version Trigger  - This Trigger will be used to convert the attachment from Email message to related record. 

Email Message Trigger - This trigger is used to change the status of the Email Message to draft status so that the user can edit the email message. 

EmailMessageEditOverride - This Visual force page used to override the Edit button on Email Message. 

TestClass - To cover the test coverage for the above two triggers.